


A wet basement can be a homeowner’s worst nightmare. Excess moisture not only creates an unpleasant environment but can also lead to mold growth, foundation problems, and costly repairs. If your home struggles with poor drainage around the foundation, installing a French drain can be a highly effective solution.
This guide delves into the process of installing a French drain around your house, catering to both DIY enthusiasts and those seeking a better understanding before hiring a professional.
Understanding French Drains
A French drain, also known as a perimeter drain or weeping tile, is a trench filled with gravel that redirects groundwater away from your foundation. As water accumulates in the soil around your house, it seeps into the gravel-filled trench and is channeled to a suitable drainage point, keeping your basement dry.
Benefits of a French Drain System
-
Prevents Basement Flooding: By intercepting groundwater before it reaches your foundation, a French drain effectively prevents basement flooding and moisture issues.
-
Protects Foundation: Excess moisture can weaken your foundation over time. A French drain helps safeguard your home’s structural integrity.
-
Reduces Mold Growth: Mold thrives in damp environments. A French drain system helps control moisture levels, inhibiting mold growth and promoting a healthier indoor environment.
-
Improves Landscaping: French drains can also help address drainage problems in yards, preventing soggy patches and promoting healthier plant life.
Before You Start: Planning and Preparation
Installing a French drain requires careful planning and preparation. Here are some crucial steps to consider:
-
Call Before You Dig: This national service (811 in the US) helps locate underground utilities to avoid accidental damage during digging.
-
Obtain Permits: Check with your local building department to determine if a permit is required for your project.
-
Gather Your Tools: You’ll need a shovel, pickaxe (for tough ground), level, tape measure, utility knife, safety glasses, work gloves, and a tamper (a flat tool to compact soil). Renting a trenching machine can significantly speed up the digging process.
-
Materials: Purchase perforated PVC pipe (at least 4 inches in diameter), gravel ( ¾ inch to 1 ½ inch diameter), landscape fabric, and fittings for the pipe (elbows, connectors) if needed. You might also need clean-out risers for future maintenance access.
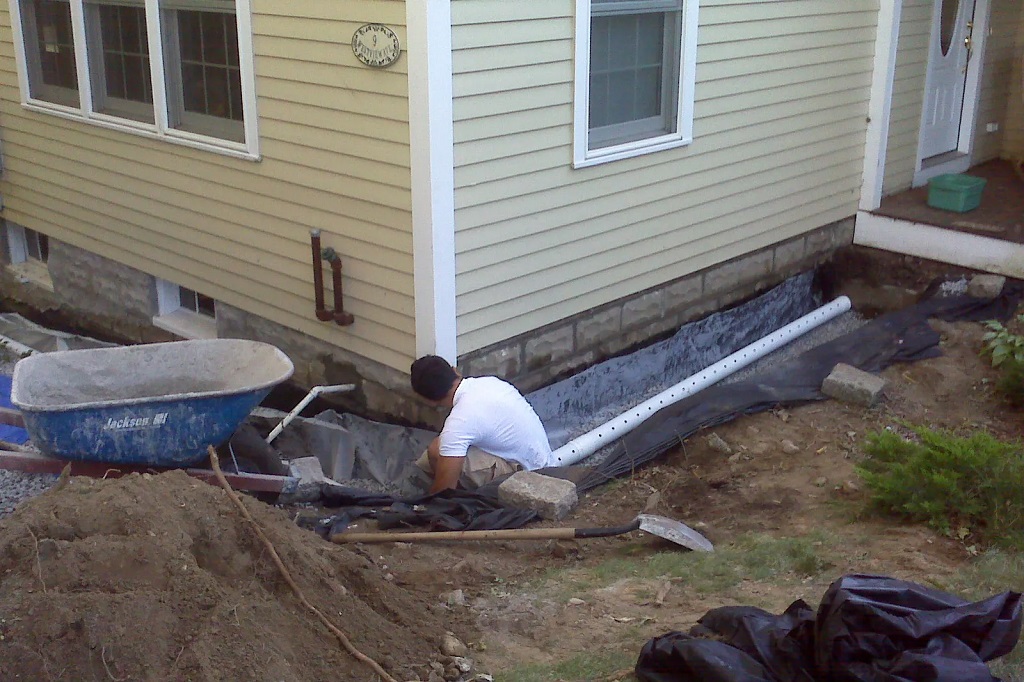
Installing Your French Drain: A Step-by-Step Guide
Here’s a breakdown of the installation process:
-
Plan the Trench Location: Walk around your house perimeter and identify areas with water pooling or poor drainage. The trench should be dug at least a foot away from your foundation wall and extend at least 10 feet beyond the edge of your roofline to effectively capture rainwater runoff. Maintain a slight slope (around ¼ inch per foot) as you mark the trench path.
-
Dig the Trench: Following your markings, start digging the trench. Aim for a depth of at least 18 inches, but deeper might be necessary depending on your soil conditions and the water table level. Ensure the trench bottom slopes consistently towards your chosen drainage point, which could be a dry well, pop-up drain emitter, or a connection to your storm drain system (consult a professional if connecting to your storm drain).
-
Line the Trench (Optional): While not always necessary, lining the trench bottom and sides with landscape fabric can help prevent soil from clogging the gravel and improve drainage efficiency. Overlap the fabric at the corners and secure it with landscape staples.
-
Install the Drain Pipe: Lay the perforated PVC pipe along the bottom of the trench, ensuring it follows the slope towards the drainage point. Connect pipe sections using appropriate fittings if needed. Leave clean-out risers at strategic points for future maintenance access (optional).
-
Fill the Trench with Gravel: Pour the gravel over and around the perforated pipe, ensuring it fills the trench cavity. The gravel size should be large enough to allow water to flow freely but small enough to prevent soil from filtering through.
-
Wrap the Remaining Fabric (Optional): If you use landscape fabric, fold the excess fabric over the top of the gravel to create a secure envelope.
-
Backfill the Trench: Carefully refill the trench with the excavated soil, compacting it firmly as you go. Avoid damaging the pipe or fabric while backfilling.
Additional Considerations
-
Diverting Downspouts: Consider redirecting downspouts from your gutters to discharge water further away from your foundation. This reduces the amount of water the French drain needs to handle.
-
Professional Help: While installing a French drain can be a DIY project, it’s physically demanding and requires some technical knowledge. If you’re unsure about any aspect of the process, don’t hesitate to consult a professional drainage contractor. They can assess your specific situation, recommend the most suitable solution, and ensure the job is done correctly to protect your home from water damage.
Maintaining Your French Drain System
Once your French drain is installed, proper maintenance is crucial for optimal performance. Here are some tips:
-
Clear Debris: Regularly remove any leaves, twigs, or other debris that might accumulate around the drain inlet or outlet.
-
Inspect Clean-Out Risers (if installed): If you have clean-out risers, periodically remove the caps and check for clogs within the pipe. You can use a plumber’s snake to clear minor blockages.
-
Re-grade the Soil (if needed): Over time, the soil around the trench might settle. If you notice water pooling near the surface, you might need to re-grade the soil to maintain a slight slope towards the drain.
Safety Precautions
-
Call Before You Dig: This is crucial to avoid accidentally damaging underground utilities like electrical wires, gas lines, or water pipes.
-
Protect Yourself: Wear work gloves, eye protection, and sturdy shoes while digging and handling tools.
-
Be Mindful of the Depth: Deep trenches can be unstable. If digging a deep trench, consider shoring up the sides to prevent cave-ins.
-
Seek Help for Heavy Lifting: Don’t attempt to lift heavy objects like large rocks or gravel by yourself. Recruit a helper or use appropriate lifting equipment.
Related: CAN YOU USE GLUE TO REMOVE A STRIPPED SCREW?
Conclusion
A properly installed and maintained French drain can effectively safeguard your home from basement flooding and moisture issues. By following the steps outlined above and prioritizing safety, you can tackle this project yourself or gain valuable knowledge before consulting a professional. Remember, a dry basement is a healthy basement, and a French drain can be a powerful tool in achieving that goal.