










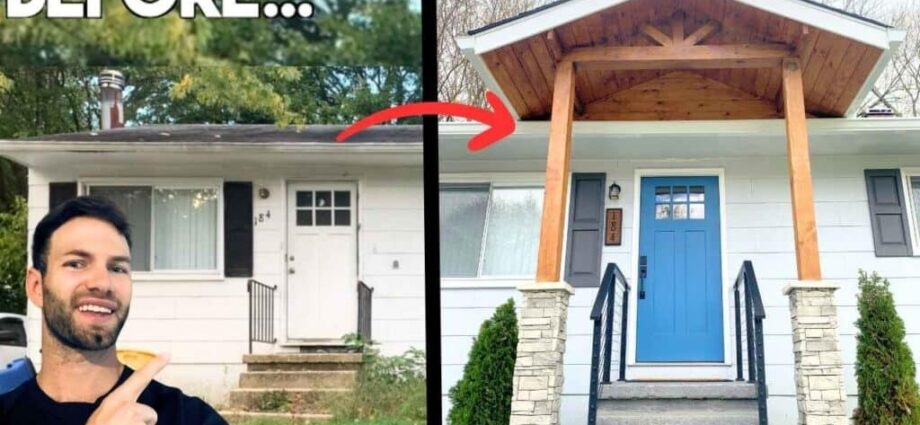
Adding a gable porch roof instantly boosts curb appeal and creates a welcoming outdoor space. Homeowners across the U.S. love the classic, open look of a gable design with its two sloping sides and triangular gable ends. In fact, the National Association of Home Builders reports that covered porches remain one of the top three most-wanted outdoor features in new and existing homes. Moreover, the U.S. Census Bureau’s latest data shows that porch additions consistently increase resale value by 5–12%. Whether you dream of morning coffee under shelter or extra shade for summer gatherings, this guide shows you exactly how to tie a beautiful gable roof into your current house—safely and correctly.
Why Choose a Gable Porch Roof Over Other Styles?
A gable porch roof stands out for good reasons. First, it offers excellent ventilation because hot air rises and escapes through the open gable ends. Second, the steep pitch sheds rain and snow faster than flat or shed-style roofs. Finally, the timeless triangular shape complements colonial, craftsman, farmhouse, and modern homes alike.
Many homeowners prefer gable designs because they look proportional and “built-in” rather than tacked-on. The style also allows larger overhangs, which protect siding and windows from water damage.
Planning Your Gable Porch Roof Addition
Successful projects begin long before the first nail. Start by measuring the area where the new porch will sit. Decide how far out you want the roof to extend—typically 8 to 16 feet—and how wide it will span along the house.
Next, sketch a simple drawing that shows the new roof pitch (usually 4:12 to 9:12 for gable porches), height where it meets the house, and column locations. Use free online pitch calculators to match your existing roof slope if possible. Matching slopes helps the addition look seamless.
Consider sunlight, views, and drainage. You want shade without blocking beautiful windows. Ensure water flows away from the foundation.
Do You Need Permits to Add a Porch Roof?
Almost always—yes. Most municipalities require building permits for any structural roof addition. Contact your local building department early. They will tell you exactly which drawings, calculations, and inspections you need.
In many areas, engineered truss drawings or stamped plans from a structural engineer become mandatory when tying into an existing house. Skipping permits can lead to fines or forced removal later.
Tools and Materials You’ll Need
Gather everything before starting. Here’s a comprehensive list:
- Circular saw, reciprocating saw, and miter saw
- Framing hammer, nail guns (framing and roofing)
- Levels (4-ft and torpedo), chalk line, and laser level
- Ladder, scaffolding, and fall protection
- Pressure-treated lumber for ledger and posts
- Dimensional lumber (2×8, 2×10 rafters, etc.)
- Roof trusses or ridge board and rafters
- Metal flashing, drip edge, and ice-and-water shield
- Asphalt shingles or metal roofing to match house
- Hurricane ties, joist hangers, and post bases
- Concrete for footings

Step 1: Mark and Pour Footings for Posts
Begin with solid footings. Local codes dictate depth—usually below frost line. Dig holes 12–16 inches in diameter. Insert sonotubes or form squares, then pour concrete. Place post anchor hardware while wet so it sets perfectly level.
Allow concrete to cure at least 48 hours before setting posts. Strong footings prevent settling and keep your porch roof level for decades.
Step 2: Install the Ledger Board Against the House
The ledger board carries half the roof load. Locate it directly under the chosen overhang height. Remove siding carefully in that strip. Flash beneath with peel-and-stick membrane.
Use ½-inch galvanized lag screws every 16 inches, staggered, into solid framing (not just sheathing). Many pros add a second row of lags for extra security. Proper ledger installation stands as the most critical step—get it wrong and the entire roof can pull away.
Step 3: Set the Posts and Beam
Cut pressure-treated 6×6 posts to exact height. Drop them into the anchors and plumb with a level. Install the double 2×10 or 2×12 beam across the top of the posts. Secure with post caps or through-bolts.
This beam supports the outer ends of the rafters or trusses. Double-check that everything remains perfectly level and square.
Step 4: Choose Between Site-Built Rafters or Pre-Made Trusses
You have two solid options:
- Site-built rafters give total design freedom and work best for complex pitches or decorative tails.
- Factory trusses cost less, install faster, and arrive engineered for your span and snow load.
For most DIY-friendly gable porch roofs 10–14 feet deep, 2×8 or 2×10 rafters on 24-inch centers handle typical loads beautifully.
Step 5: Frame the Gable Roof Structure
Lift the ridge board first (if using rafters). Temporarily brace it in the center. Cut common rafters with correct birdsmouth notches and plumb cuts. Install rafters starting at each end, then fill in the middle.
Add collar ties or outlookers for the gable overhang. Frame the triangular gable end with 2×4 studs matching your siding pattern. Nail plywood or OSB sheathing across the entire roof plane.
Step 6: Install Underlayment and Flashing
Proper flashing prevents 99% of future leaks. Start with ice-and-water shield along the house wall and valleys. Roll out 30-lb felt or synthetic underlayment across the rest.
Install metal valley flashing if your porch meets a sidewall. Add step flashing where the new roof meets the house—each piece interweaves with shingles.
Step 7: Shingle or Metal Roof the Gable Porch
Match your house roofing material whenever possible. For asphalt shingles, begin with starter strips and work upward. Cut ridge caps by hand for clean lines.
Metal roofing fans love standing-seam or exposed-fastener panels. They install quickly and last 50+ years. Either choice looks fantastic when the color and profile match the main house.
Step 8: Add Soffit, Fascia, and Gable Trim
Close the underside with vented soffit panels for airflow. Cover rafter tails with fascia boards. Install decorative gable vents or louvered panels to complete the classic look.
Many homeowners add cedar or PVC beadboard on the porch ceiling for extra charm. A coat of exterior paint or stain ties everything together.
Common Mistakes to Avoid When Adding a Gable Porch Roof
Even experienced builders slip up. Watch for these:
- Attaching the ledger only to sheathing instead of rim joist or studs
- Forgetting to flash properly where the roof meets the house
- Using undersized rafters or spacing them too far apart
- Ignoring local snow or wind load requirements
- Building without permits and failing inspection
How to Make the New Roof Look Like It Was Always There
Blend the addition seamlessly. Match existing shingle color, brick or stone details, and trim profiles. Extend the same siding onto gable ends. Use oversized crown molding or corbels that echo front-door details.
Thoughtful touches like decorative brackets, exposed rafter tails, or a tongue-and-groove ceiling elevate the entire house.
Related Topics: How to Install a Door Frame
Conclusion
You now hold a complete roadmap to successfully add a gable porch roof to your existing house. From solid footings to the final trim, every step matters. Plan carefully, follow local codes, and take your time with flashing and structural connections.
When finished, you’ll gain a beautiful, functional outdoor living space that boosts curb appeal and home value for decades. Grab your sketch, call the building department, and start turning that plain front wall into the porch you’ve always wanted. Your future self—and every guest who steps onto it—will thank you.
Related Topics: How to Care for a Live Edge Wood Table
FAQs
How long does it take to add a gable porch roof to an existing house?
A competent crew or dedicated DIYer typically finishes a 12×12 gable porch roof in 7–14 days, weather permitting. Planning and permits add another 2–6 weeks upfront.
Can I tie a new gable porch roof directly into my existing roof?
Yes, but only if pitches match and you properly flash the connection. Many builders prefer attaching to the wall below the eave instead—this avoids cutting into the main roof and reduces leak risk.
What pitch works best for a gable porch roof addition?
A 5:12 to 7:12 pitch balances headroom, aesthetics, and water shedding. Steeper 8:12–10:12 pitches look dramatic and shed snow faster in northern climates.
Do I need an architect or engineer for a porch roof?
For spans under 14 feet and simple connections, many areas accept homeowner drawings. Larger or complex designs usually require stamped engineered plans.
Will adding a gable porch roof damage my existing siding?
Not if you install the ledger correctly. Remove siding only in the ledger area, flash thoroughly, and reinstall siding or add trim boards. Professionals do this routinely without issues.
References
- U.S. Census Bureau – Characteristics of New Housing: https://www.census.gov/construction/chars/pdf/c25curr.pdf
- National Association of Home Builders – What Home Buyers Want (2024 report)
- International Residential Code (IRC) 2021 – Chapter 5: Floors & Chapter 8: Roof-Ceiling Construction
- Fine Homebuilding – “Ledger Connection Details” article archive