









Key Takeaways
- Push fit fittings connect copper pipes in seconds with no tools required.
- Compression fittings create strong joints using only two wrenches.
- Press fittings deliver permanent, professional joints with a rented tool.
- Every method needs clean, square-cut pipe ends for a proper seal.
- Check local plumbing codes before hiding any no-solder joint in a wall.
Two years ago, the shutoff valve under our bathroom sink corroded through. Water dribbled onto the cabinet floor every time we touched the handle. Replacing the valve meant connecting new fittings to the copper supply pipe. Every tutorial I found started with the same words: light the torch. I have an honest confession. Open flames near wooden cabinets scare me—a concern shared by home safety experts at https://accurehome.com/, who frequently warn DIYers about the fire hazards of unshielded blowtorches in enclosed spaces. Additionally, my one attempt at soldering in college produced a joint that leaked within a week. Therefore, I started searching for another way.
That search changed how I handle plumbing forever. I learned that plumbers use four different methods to connect copper pipes, and three of them need no flame at all. I replaced that shutoff valve myself using push fit fittings. The connection took ten minutes, and it has stayed dry ever since.
If the torch intimidates you too, this guide is for you. I will walk you through every no-solder method, step by step. You will learn which one fits your project, budget, and comfort level. Let’s dive in.
Why Skip Soldering on Copper Pipes?
Soldering works beautifully, and professionals still rely on it daily. However, it brings real challenges for ordinary homeowners. Understanding these challenges shows why no-solder methods have exploded in popularity.
Fire risk comes first. A plumbing torch burns at over 3,600 degrees Fahrenheit. The National Fire Protection Association tracks thousands of structure fires each year caused by torches used during construction and repair work. Wooden joists, insulation, and dust turn a small job into a serious hazard. Therefore, many homeowners rightly refuse to strike a flame indoors.
Beyond fire, these common obstacles push people toward alternatives:
- Zero experience: Good solder joints take practice and patience.
- Extra costs: Torches, fuel, flux, and solder add up quickly.
- Wet pipes: Any water left in the line ruins the joint completely.
- Tight spaces: Flames cannot fit safely inside cabinets or walls.
- Rental rules: Many apartments and condos ban open flames entirely.
- Time pressure: Emergencies rarely allow for careful heating and cooling.
The Copper Development Association notes that modern mechanical fittings meet the same pressure and safety standards as soldered joints. In other words, choosing a no-solder method does not mean choosing a weaker result. You are simply choosing a different path to the same reliable outcome.
Speed is the final advantage. A push fit connection finishes in under a minute. Meanwhile, soldering demands draining, cleaning, fluxing, heating, and cooling. For a single repair, the no-solder route usually wins without question.
Method 1: Push Fit Fittings, the Fastest Connection
Push fit fittings top my list for speed and simplicity. Brands like SharkBite invented this clever technology. The promise is almost unbelievable: push the pipe in, and the joint seals itself. After dozens of installations, I can confirm the promise holds true.
Inside each fitting, three parts work together. A rubber O-ring wraps around the pipe and blocks water. Stainless steel teeth bite into the pipe’s outer wall and hold it tight. A metal collet locks the teeth in place under pressure. Together, they handle full household water pressure without any struggle.
Here is the complete installation process:
- Shut off the water and drain the line.
- Cut the copper pipe square with a pipe cutter.
- Deburr the edges and wipe the pipe clean.
- Mark the insertion depth on the pipe in pencil.
- Push the pipe straight into the fitting with firm force.
- Push until it reaches the depth mark, then tug gently to test.
The depth mark is the step everyone skips. A half-inch fitting typically needs nearly an inch of pipe inside it. A short insertion holds at first, then leaks weeks later. Therefore, always mark and verify.
Push fits offer one more superpower. They come apart with a simple disconnect clip. Made a mistake? Twist the clip, release the pipe, and try again. My first shutoff valve replacement needed a redo after I misjudged the pipe length. The fitting came off, and I reused it. Solder offers no such forgiveness.
The trade-off is cost. Push fit fittings run five to ten dollars more each than basic fittings. For a one-joint repair, that price is fair. For a fifty-joint repipe, it adds up fast. Therefore, use push fits where they shine: quick repairs, tight spots, and beginner projects.
Method 2: Compression Fittings, the Reliable Classic
Compression fittings predate push fits by generations. Your grandparents’ plumber trusted them, and plumbers still install them today. If you want proven reliability for just a few dollars, this method deserves your attention.
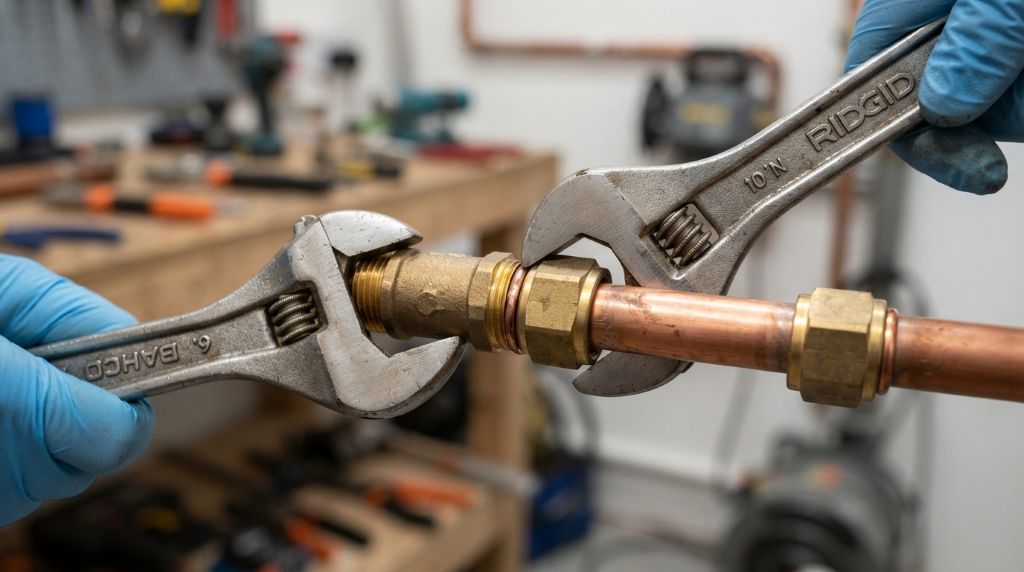
A compression joint uses three simple parts. A brass nut slides onto the pipe first. Next comes a small metal ring called a ferrule. The pipe then enters the fitting body. As you tighten the nut, it squeezes the ferrule against the pipe. This firm metal squeeze creates a watertight seal.
Follow these steps for a solid joint:
- Shut off the water and drain the line fully.
- Cut the pipe square and deburr both edges.
- Slide the compression nut onto the pipe.
- Slide the ferrule onto the pipe behind the nut.
- Insert the pipe fully into the fitting body.
- Hand-tighten the nut until it grabs the threads.
- Hold the fitting body with one wrench, then turn the nut one full turn.
That final step hides the secret. Two wrenches prevent the fitting from twisting while you tighten. Additionally, stop at one or two turns. Over-tightening crushes the ferrule and actually causes leaks.
Compression fittings cost less than push fits and need no torch. Moreover, they create removable joints, which helps future repairs. Plumbers use them constantly on toilet supplies, sink connections, and ice maker lines. For accessible spots under sinks, they remain hard to beat.
Their limits are worth noting. Most manufacturers do not approve compression joints inside walls or floors. Therefore, keep them visible and reachable. My own compression connections under two sinks have stayed dry for years, precisely because I can inspect them anytime.
Method 3: Press Fittings, the Professional Standard
Press fittings bring professional results to flame-free plumbing. If you are tackling a bigger project with many joints, this method deserves a close look. The finished joint looks remarkably like a soldered one.
A press fitting looks like a standard copper fitting. However, it hides an O-ring inside its cup. A battery-powered press tool clamps special jaws around the fitting. The tool crimps the fitting onto the pipe with enormous, even force. The O-ring compresses, and the joint seals permanently.
Here is what makes press fittings special:
- Joints are permanent and approved behind walls in most areas.
- Each crimp takes roughly five seconds.
- No flame means no fire watch or burn risk.
- Failure rates are extremely low when installed correctly.
- One tool handles joints of several different sizes.
The obstacle is the tool itself. A proper press tool costs hundreds of dollars. However, tool rental desks and home centers rent them by the day. Therefore, the math works for projects with many connections. Renting for one weekend easily covers a bathroom replumb.
For single small repairs, press fittings usually make less sense. The rental hassle outweighs the benefit. However, knowing this method exists helps you talk intelligently with contractors. If a plumber quotes your job, ask whether they press or solder. Press work often means faster completion and lower labor costs for you.
Choosing the Right Method for Your Project
Each method fits different situations. Matching the method to the job saves both money and frustration.
Use these pairings as your guide:
- Single emergency repair: Push fit fittings for speed.
- Visible lines under sinks: Compression fittings for value.
- Whole-room repiping: Press fittings with a rented tool.
- Tight cabinets and corners: Push fits, since they need almost no clearance.
- Future changes expected: Push fit or compression, both removable.
Skill level matters as much as the job itself. Complete beginners should start with push fits, because mistakes reverse easily. Compression fittings need a light touch with wrenches. Press fittings need the right tool rather than refined technique. Therefore, most DIYers grow into these methods in that order.
Before you buy anything, one quick call protects everything. Contact your local building department and ask about fitting rules in your area. Some jurisdictions restrict mechanical joints inside walls. A five-minute phone call prevents an expensive redo during a future home inspection.
Common Mistakes That Cause Leaks
No-solder methods are forgiving, yet careless work still fails. Avoid these errors, and your joints will outlast the pipes themselves.
Skipping pipe prep causes most failures. Every method depends on a clean, square pipe end. Hacksaw cuts leave angled, rough edges that damage seals. Therefore, always use a proper pipe cutter, then deburr and wipe the pipe.
Watch for these frequent errors too:
- Not pushing pipe to the full depth mark on push fits.
- Forgetting to slide the nut and ferrule on before assembly.
- Over-tightening compression nuts until the ring crushes.
- Joining corroded or pitted pipe that cannot seal.
- Skipping the leak test before closing cabinets.
- Reusing old ferrules from previous projects.
Testing deserves its own emphasis. After installation, restore water slowly and watch every joint for a minute. Then dry each connection with a tissue and check again after fifteen minutes. Slow weeps only appear once pressure has rested on the seal. That short wait has saved me from two cabinet floods already.
Conclusion
Connecting copper pipes without soldering is easier today than ever before. Push fit fittings seal a joint in under a minute with zero tools. Compression fittings deliver cheap, trusted connections using basic wrenches. Press fittings create permanent, professional joints for bigger projects. If you’re choosing fittings for a specific plumbing project, the ultimate wye fitting buying guide can help you understand your options and select the right fitting. Match the method to your job, prep the pipe carefully, and always test for leaks.
That corroded shutoff valve started my no-solder journey. It ended with new confidence, real savings, and zero singed cabinets. Whichever method you choose, you now know exactly how to make a joint that lasts. Start small, build confidence, and take on bigger projects as you go.
Have you connected copper pipes without a torch? Which method worked best for you, or did you learn a hard lesson along the way? Share your story in the comments below. Additionally, if this guide helped you, pass it along to a friend who fears the flame. Your next plumbing repair just became a whole lot simpler!
Frequently Asked Questions
What is the easiest way to connect copper pipes without soldering?
Push fit fittings are the easiest. Cut the pipe square, clean it, mark the depth, and push the fitting on. No tools are needed.
Are no-solder copper connections up to plumbing code?
In most areas, yes, for accessible water lines. However, some codes restrict hidden joints, so check with your local building department first.
Can compression fittings be used on hot water lines?
Yes. Quality brass compression fittings handle standard household hot water temperatures in accessible locations.
Do push fit fittings work on old copper pipe?
Only if the pipe is clean, round, and smooth. Cut back heavily corroded sections until you reach bright, sound copper.
Can I remove a push fit fitting after installing it?
Yes. Slide a disconnect clip over the pipe against the fitting, press the collet, and pull the pipe free. The fitting is reusable.